
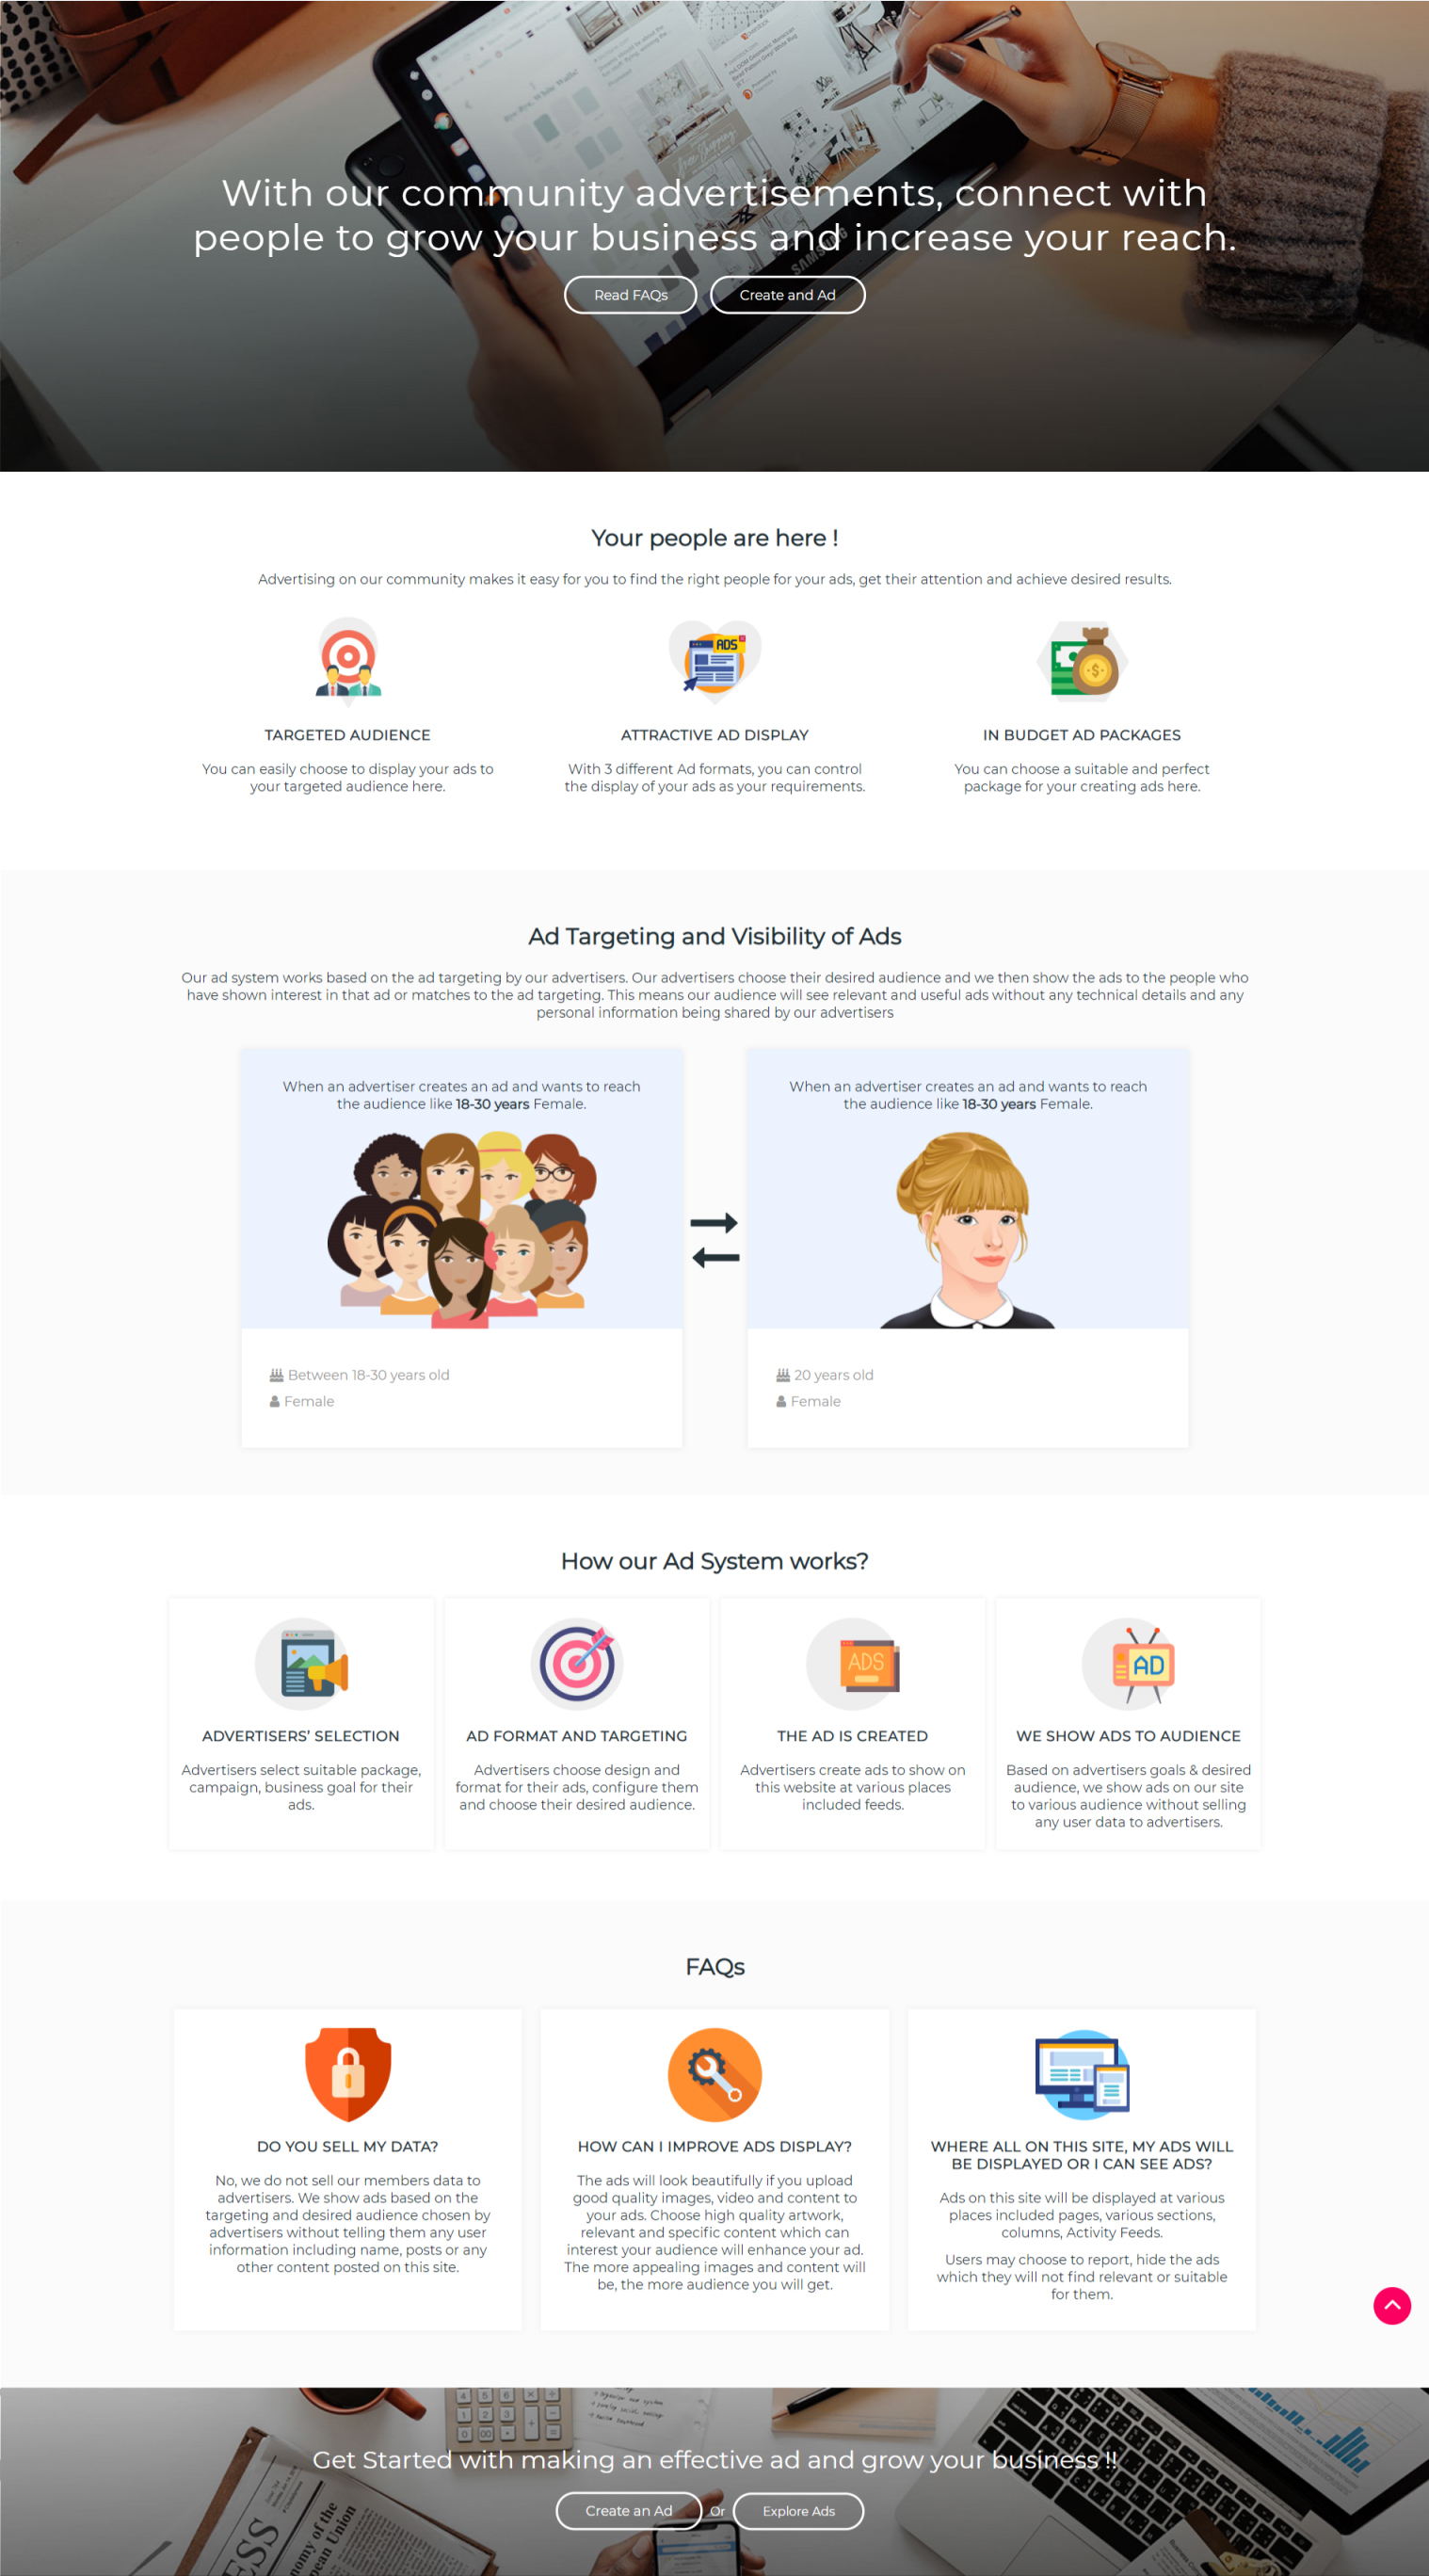
What is the need of this Plugin?
- Advertising gives companies and businesses the opportunity to build up a brand and an identity.
- Attractive Ads with different view Types will increase the chances of making it more Popular.
- Great source of earning revenue and simply creates the awareness among social communities.
- If any company wants to introduce or launch a new product in the market, advertising will make a ground for the product.
- Create awareness for valuable content with a call to action.
- More Ads More Customers and more Popularity to your Business.
Key Features
Get this plugin and give your members a great tool for creating Advertisements.
-
 Ads Creation and ManagementShow More
 -
Free & Paid Ad PackagesShow More
-
Ad CampaignsShow More
-
4 Types of AdsShow More
-
Boost Post AdsShow More
-
Page AdsShow More
-
Website Content AdsShow More
-
External Website AdsShow More
-
Ad Preview while creation of AdsShow More
-
3 Type of Ads FormatShow More
-
Carousel AdsShow More
-
Single Image AdsShow More
-
Video AdsShow More
-
CTA Button for AdsShow More
-
Ads TargetingShow More
-
Ad SchedulingShow More
-
3 Advertising ModelsShow More
-
Ad Display & SearchingShow More
-
Ad CategoriesShow More
-
Secure TransactionsShow More
-
Mails & NotificationsShow More
-
Downloadable Ad ReportsShow More
-
Submit Report for Offensive AdsShow More
-
3rd party plugins integrationShow More
-
Integration with Professional Feeds & Comments pluginShow More
-
Help CenterShow More
-
WidgetsShow More
-
Member Level SettingsShow More
-
Robust Admin PanelShow More
-
100% ResponsiveShow More
-
One Click Easy InstallShow More
-
Attractive Banner Slideshow90 Days free support


Ads Creation and Management
Ads Creation
Advertisements can be easily created on your website with the help of this plugin. It provides you the various new exciting features which make it different from other Advertisements Tools. But before creating it you have to first enable the Packages from Admin Panel.
Also Admin is allowed to create and configure new packages(Free or Paid). You can choose any of the desired package which suits your Ad and create Ads for your Website.
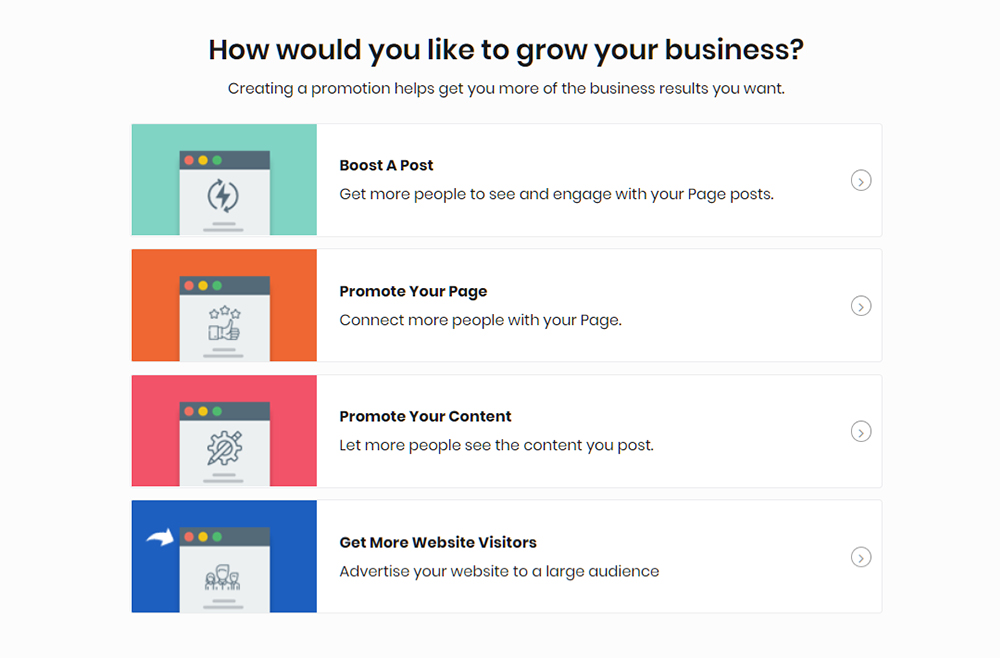
Also you can create 4 different types of Ads by using this plugin:
- Boost a Post
- Promote Your Page
- Promote Content
- Get More Website Visitors.
3 different Ads Format such as Single Video, Single Image and Carousel make your Ads more attractive and effective.
Ads Management
This plugin also provides you the management of Ads on your website.
Once an Advertisement get started, the user is not able to edit it. But Admin have the rights to manage them.
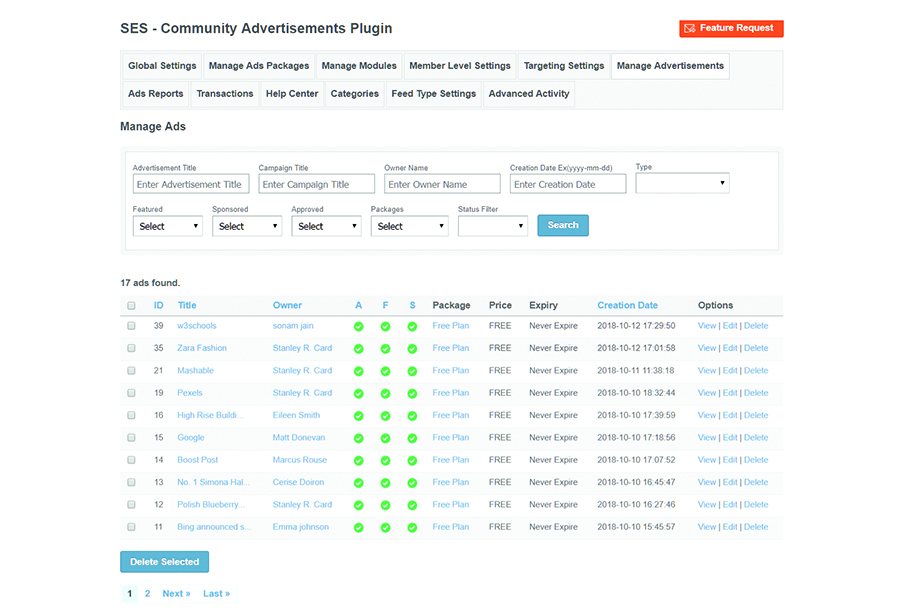
In Admin Panel Ads can be managed under Manage Advertisements section.
Here Ads can be Viewed, Edit or Delete.You can also review your Ads whenever you require.
Also you can mark any Package as Default Package for your website which members can choose while creation of Ads.
Also Ads can be marked as Featured, Sponsored manually.Other details related your Ad get displayed here.
Ads can be manually marked as featured and Sponsored from Admin Panel if required.
Ad details can also be viewed here that are created by the users on your website.
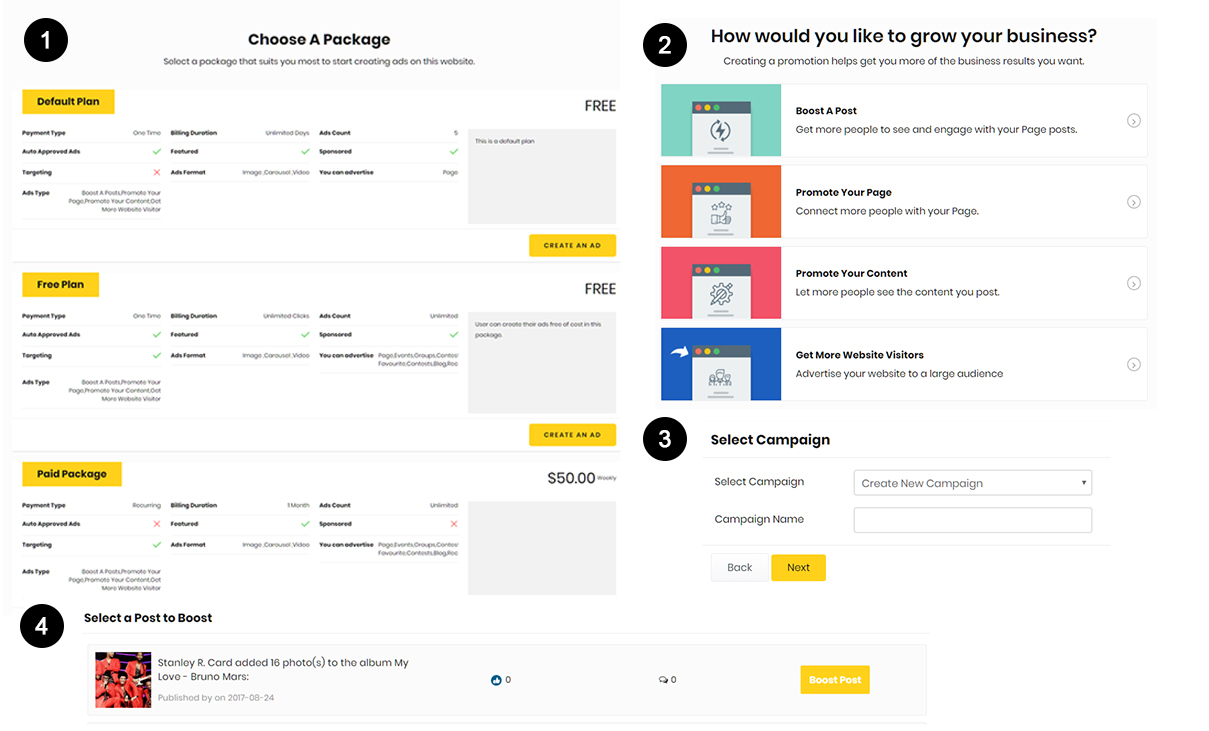
Package Selection
Package selection is the first step which user have to choose before creating any Ad. It can be paid or Free. Choose the desired package and then click on ‘Create an Ad’ button.
Features provided in the Package will depend upon the Package creator who create it from Admin Panel.
Choose Ad Type
These advance Ad types will make your Ad creation experience much better and interesting on your website. Here you are provided with the 4 types of Ads which you can create easily. All these Ad types will be enabled from Admin Panel while Package Creation.
Select Campaign & Category
You are allowed to create thousands of Campaigns and can categorized your Ads into various categories which make your advertising more managed, responsive and easy to understand.
Ad Format Selection
This step provides your members to create Ads with three amazing formats selection:
- Carousel Ads
- Single Image Ads
- Video Ads
Headings, Description and Destination URLs can be given in these Ads formats. CTA (Call To Action) buttons are also provided for all these formats.
Select Targeting for Ads
Targeting is the only feature with the help of which you can allow viewing of Ads to only limited members that match the constraints of Targeting which you have mentioned at the time of Ad creation.
Scheduling of Ads
You can set Date & Time(Start and End) for your Ads at the time of its creation.This scheduling will work for your Ads till the end date.
Also if you want your Ad to work forever then there is no need to give end date in Scheduling section.
View Ad
After its creation you can see recently created Ad with all its details like its Name, Status, Approved Date, Start date, Ad Type etc. If it is a free Ad then it will get start immediately, but if it is a Paid Ad then follow the next Step.
Make Payment
If it is a Paid Ad then it will only start after the successful payment through Payment Gateway. In order to complete the Payment, Click on Make Payment button after Ad creation. Payment feature for your Ads will only work if Admin have configured the Payment Gateway(PayPal) from Admin Panel. You can easily pay for your Ads by entering your PayPal Credentials.
Successful Transaction Message
Once the Payment for the Ad gets completed a beautiful interface will update the user with the successful transaction message at its end. This will describe the secure transaction which took place for Paid Ads on your website.
Ads are ready to show
Your Ads are now ready to show at various pages and widgets on your website.
This is the final Stage where you can check every aspect of your Ad and take its review time to time.
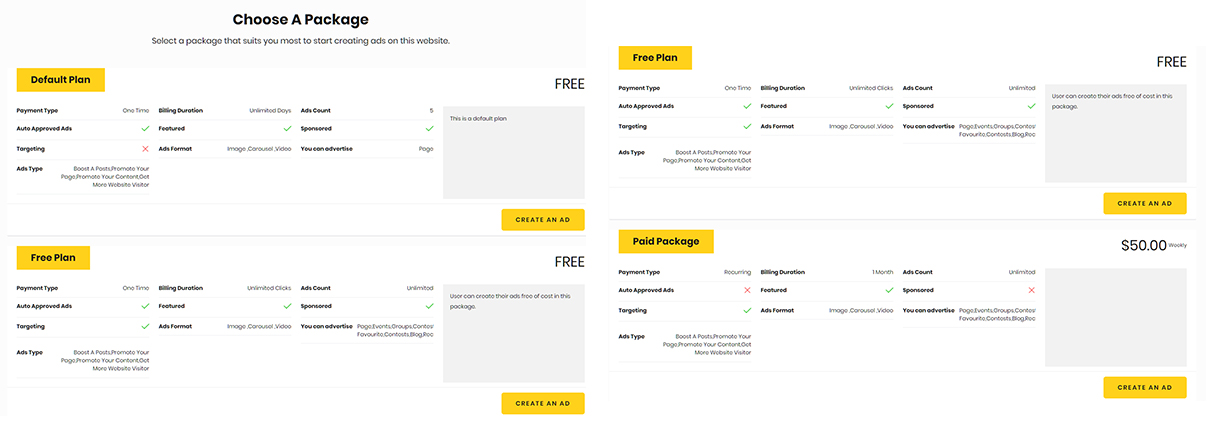
Free and Paid Packages
Do you want to monetize from the Advertisements on your website, then this is the right plugin with the help of which you can enable Packages for creating Ads on your website.
Advertisers / users will have to choose a package for an ad.It can be Free or Paid depending upon the requirement of the Package Creator.
For creating any Ad, Package should be first created and enabled on your website. You are allowed to create new package from Admin Panel under Manage Ads Packages section.
Pricing Model will work as Pay for Clicks / Views / Days.
Also you can mark any Package(free) as default Package on your website. You can also set Ads limit which user are allowed to create in a particular package.
Enable / Disable Packages
You can enable / disable packages for creating Ads on your website. If you disable packages, then the similar Ad creation settings will not apply from Member Level settings.
Package Alignment
Packages can be shown in Horizontal alignment or Vertical alignment.
Only the Existing package of the user will be shown in horizontal alignment only.
Package Title & Description
Each package can have its own title and description.
Ads Count
For each package you can choose the number of Ads users will be able to create on your website. You can also enter unlimited Ads for any Package.
Member Level
You can set the visibility of the package based on the member level of the user.
Price
A package can be made Free or Paid. So, you can enter the price of the Ad and choose the Billing Cycle to be charged:
a. One Time
b. Recurring Payment
Package Creation
You can create any number of Free & Paid packages on your website. This plugin supports payment via Paypal.Paid Packages can be charged One time payment or Recurring payment.
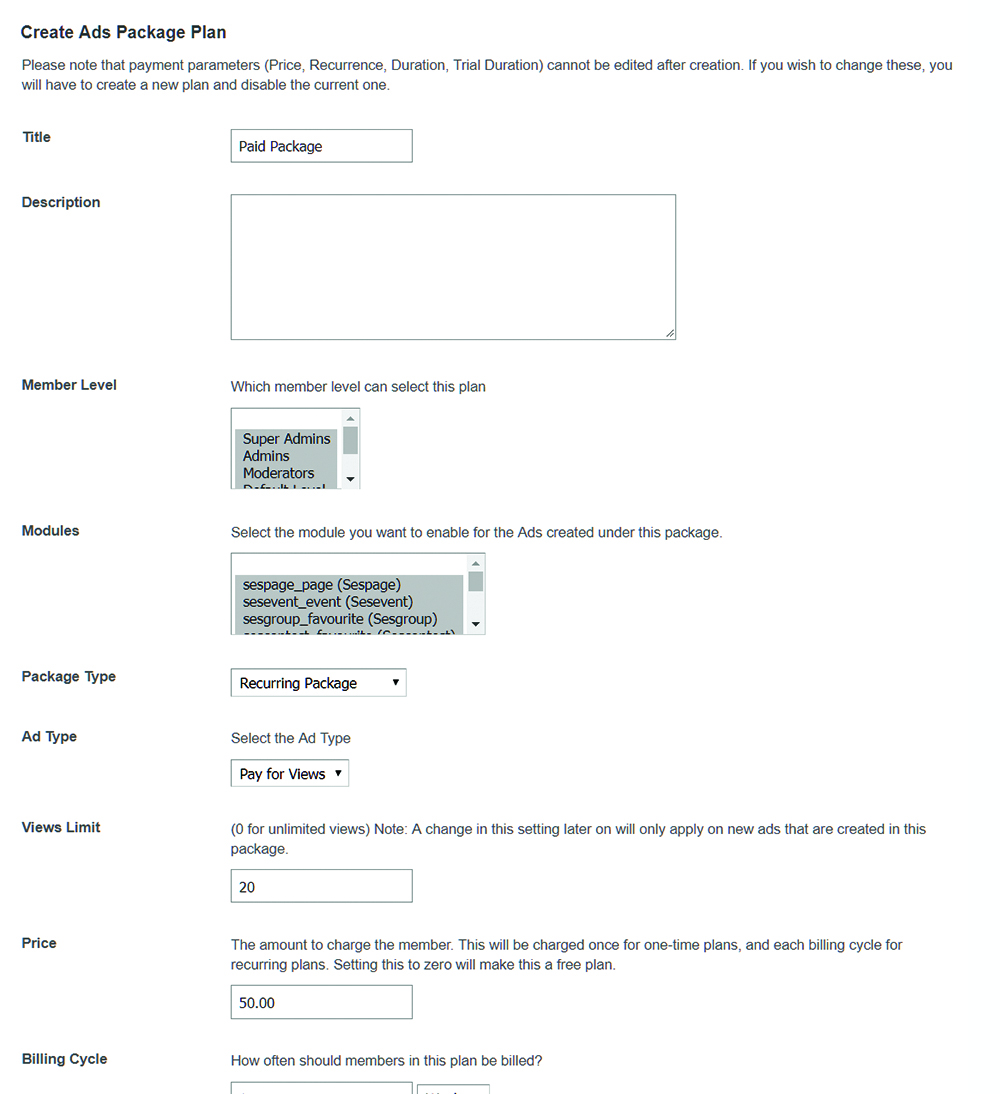
Billing Duration
You can choose when a package should expire.
Auto Approve Ads
You can choose to auto-approve Ads of paid packages and manually approve the free packages to ensure the quality of Ad content on your website.
4 Types of Ads
You can choose any type of Ad among these for creation of Ads on your Website.
The types of Ads are:
- Boost a Post
- Promote Your Page
- Promote Content
- Get More Website Visitors.
Automatically Marking as Featured or Sponsored
You can choose to automatically mark Ads created in higher packages as Featured or Sponsored so that Ad owners get more encouragement to subscribe to higher packages. This will give their Ads more visibility and weightage on your website.
Ads Formats
You can create your Ads by using these 3 amazing Ad formats(Carousel, Single Image, Video) which totally change the look of your Ads.
Targeting
You can enable Targeting for the Ads which you will create on your website. You can enable Network Targeting for your Ads as well.
Default Plan
You are allowed to make any Free Package as Default Plan which members can choose while creation of Ads on your Website.
Ad Campaigns
An advertising campaign is a series of advertisement messages that share a single idea and theme which make up an integrated marketing communication.
A set of ad groups that share a budget, location targeting, and other settings. Campaigns are often used to organize categories of products or services that you offer. In Community Advertisements you can have one or many ad campaigns running.
You can Manage, View and Delete Campaigns under My Campaigns Section where all the campaigns created by you will get listed. Also there are n no. of Ads that you can create in a single Campaigns depending upon the package which you have chosen at the time of Ad creation.
Ads Count
As there are multiple Campaigns that you can create for your Ads. So this section will display the total number of Ads that are created in a particular Campaign / Campaigns.
Views Count
The total overall count of Views for your Ads in a Campaign will get displayed in this column.
Clicks Count
Similarly Clicks Count in a Campaign will depend upon the overall clicks on all the Ads in a Campaign.
CTR(%) for Ads
Clickthrough rate (CTR) can be used to gauge how well your Ads are performing.
CTR is the number of clicks that your Ad receives divided by the number of times your ad is Viewed: clicks ÷ impressions = CTR.
Manage Campaigns
In My Campaigns section you can manage your Campaigns as well if you want. Basically you are managing the Ads that are present in any particular Campaign.
Edit Campaigns
You can also edit campaigns by clicking on Edit link at My Campaigns Page. In this you can just edit the name for your Campaign.
Delete Campaigns
If you want to delete any Campaign then you can do this as well. Simply by clicking on Delete Link or by selecting from the checkbox particularly you can delete any Campaign of your choice.
Manage Ads in a Campaign
If you want to manage any Ad then you have to first go to its Campaign and after that you are able to manage that Ad. Once the Ad gets Started then you are not able to edit it. Only you can view or delete your Ad. Only Admin can edit your Ad if required.
4 Types of Ads
The different and amazing new functionality which enhance the quality of Ads are our different types of Ads.
Basically in Community Advertisements Plugin, we have four types of Ads which you can create on your website:
- Boost Post Ads
- Page Ads
- Website Content Ads
- External Website Ads
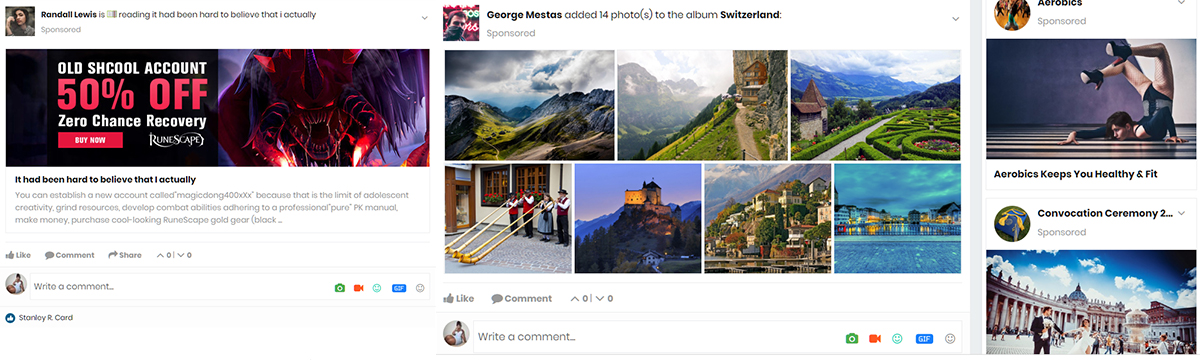
Boost Post Ads
- Boost Posts is a type of ad in Community Advertisements Plugin in which boosted Posts appear higher up in news feeds than non-boosted posts and are served to an audience beyond your existing page fans, these posts can be a relatively most reliable way to easily reach more potential customers.
- With the help of this Ad type, Posts will get boosted which you have posted from Activity feed, Page, your Profile or from anywhere on your website.This will increase the popularity of your Posts at various pages and widgets time to time.
- Options in Feed Type Settings should be enabled first from Admin Panel for the proper working of this Ad Type. By selecting this Ad type for your Ads, you can easily boost any post on your website and earn popularity among community.
Note: Boost post Ads will only work with our Professional Activity & Nested Comments Plugin only.
Page Ads
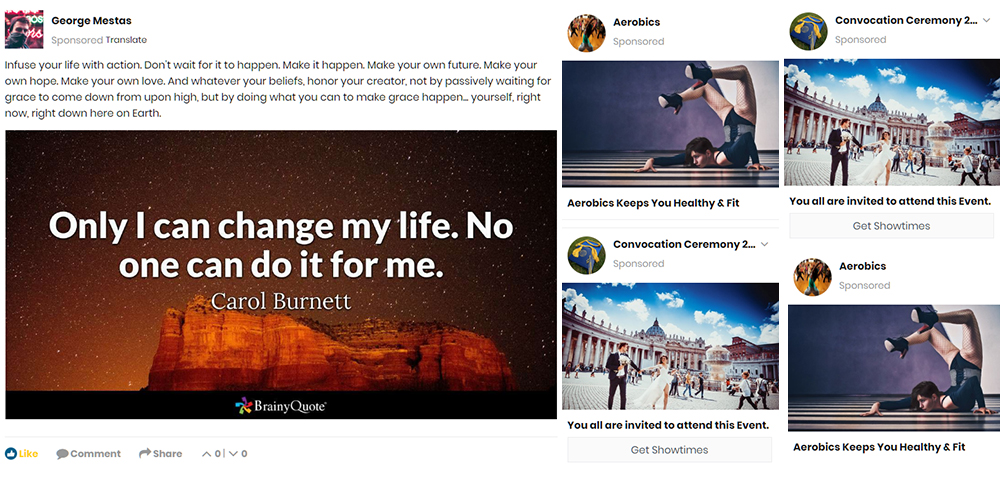
- Promoting your Business Page is done by creating ads for your Page that will help you grow the awareness and visibility of your business.
- If you want to promote your business or local interest page, then this is the right type of Ad for you. Yo can easily promote any Page in three amazing Ad formats:
- Carousel
- Single Image
- Video
- Also you can insert CTA (Call to Action) buttons for your Ads while its creation which makes it more appealing..
Note: This ad will work only with the Page Directories Plugin.
Website Content Ads
- Advertising of Content is the process of creating Ads with the intention of promoting that content through different Paid Models such as PPC, PPV and PPD.
- With its help you can select any 3rd Party Modules(Plugins) which you have integrated with your package and promote any content substituted with those modules while creating an Ad.
- Content can be of any type(feed, text, video, image etc.)

External Website Ads

- Exclusively get more website visitors by using this Ad Type.
- You can advertise your website to large audience with the help of this Ad type. It simply allows you to make your website popular and get more customers for your Business. This type of Ad is very effective for the initial startup Businesses.
- If you want to promote any external website, then you can advertise it by giving the Heading, Description and Destination URL on which you want to redirect your Users.
Ad Preview while creation of Ads
- In Community Advertisements Plugin, Ad can be previewed at the time creation of all the three types of Ad Formats.
- This will help you better to estimate the view of your Ad before its creation.
- It includes your Ad Image, Name, Description, Call to Action button and various other things your Ad is made up of.
- It displays differently of all the Ad Formats. So have a look at the images which will help you to understand much easily.
3 Type of Ads Format
Except Boost a Post type Ad, for all other Ads you are allowed to create your Ads in three amazing Formats rather than just simple text or GIFs.
These three Ads Formats are:
- Carousel
- Single Image
- Single Video
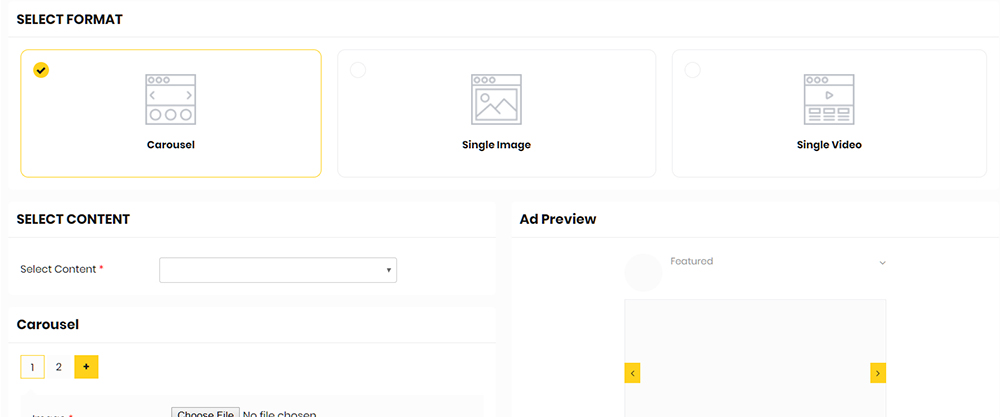
Carousel Ads
The carousel Ad format lets you show 3-5 images, headings and Destination links or calls to action in a single ad unit. In Carousel type Ad format, you can represent your Ad with multiple images, texts and descriptions.
Also you can place Call to Action Buttons for each image slide.
You can add card at the end of your carousel if you want which will redirect users to your main site who are interested in your Ad.
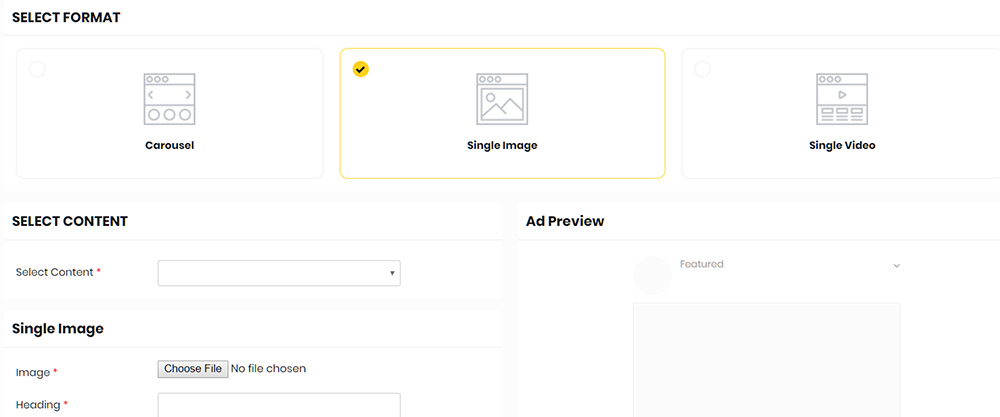
Single Image Ads
Create an ad with a single image. The single image ad format allows you to show one image in a single ad set.
Single image ads are useful when you want to capture attention for your brand using an effective image.
A single image ad can be used across most placements.Single Image Ad format allows you the most simplest Ad creation method without much efforts.
In this you can simply select any single image from your local system and can add Heading, Description, Destination URL and Call to Action Button(if required).
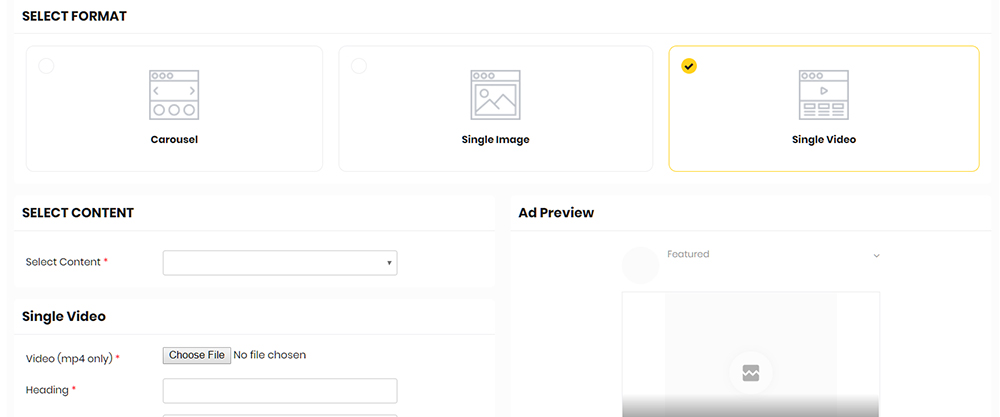
Video Ads
Increase Engagement through High Impact Video Advertising.
Capture the attention of your target audience through high-impact video advertising.
Reach your target audience through amazing video advertising and video capabilities.
In Single Video Ad Format, you can add video(MP4) for your Ads with attractive headings,valuable Description, Destination URL and CTA buttons etc.
This type of AD format is more effective as it attracts more customers and increases the popularity in market.
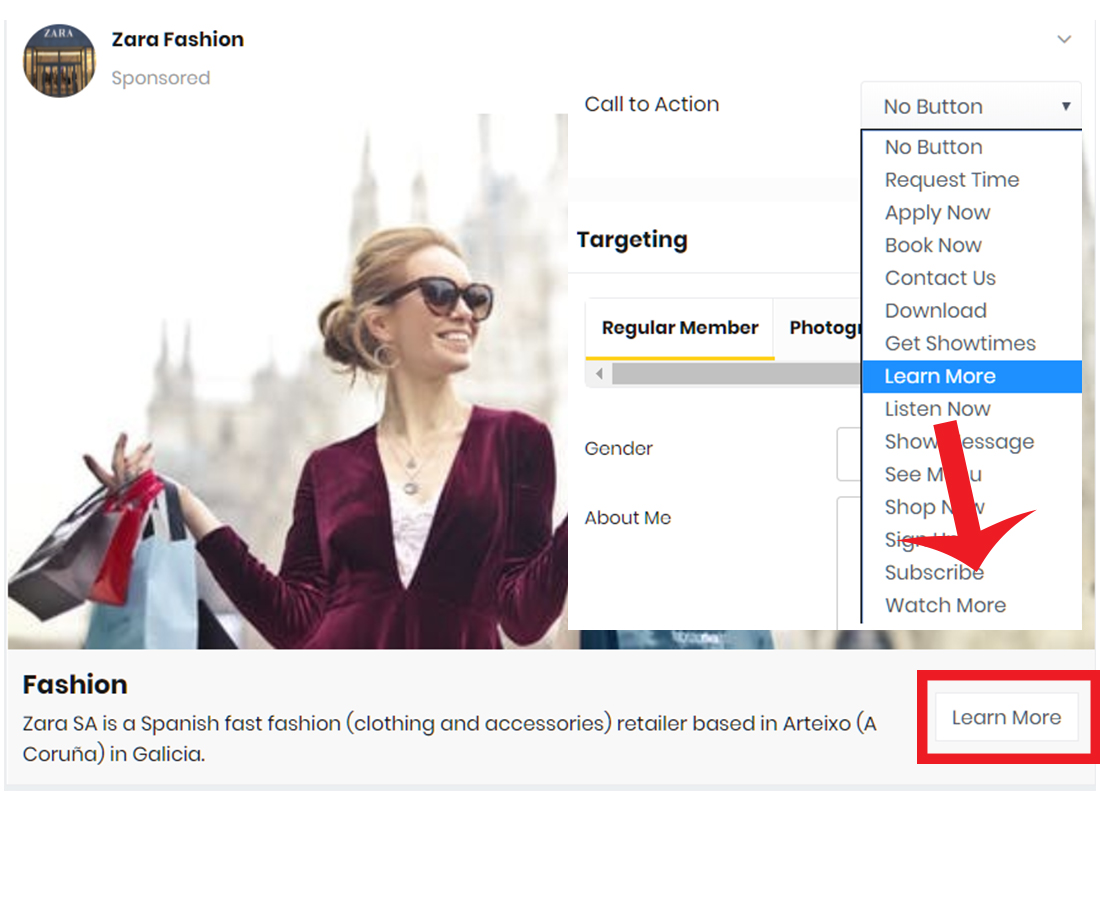
CTA Button for Ads
- In Community Advertisements Plugin, you are allowed to apply various types of CTA(Call to Action) Button on your Ads which make them more different and reachable then other Ads.
- You can place these buttons on almost all the types of Ads except Boost a Post.
- These buttons are compatible with all the three types of Ad Formats. Also you can apply it on every slide in Carousel type Ad Format.
There are various CTA Buttons which are listed under the dropdown at Ad Creation Page:
- Request Time
- Apply Now
- Shop Now
- Sign Up
- Subscribe
- Watch More
- Book Now
- Contact Us
- Download
- Get Showtimes
- Learn More
- Listen Now
- Show Message
- See Menu
Ads Targeting
- Ad Targeting is an advertisement technique where advertisements are placed in specific areas of the screen to increase “visibility” and “clickability” or to give tailor-made ads based on the user’s past interests and preferences.
- Targeted ads are meant to reach certain customers based on demographics, psychographics, behavior and other second-order activities that are learned usually through data exhaust produced by users themselves.It enables advertisers to reach target audience which is more likely to be interested in their ads.
- If the Advertiser want to show his Ads to the specific targeted members who match the mentioned criteria, then it can be enabled from ‘Target Settings’ section in Admin Panel.
In Community Advertisements Plugin, you can do targeting for your Ads on the two basis :
- Profile Type Targeting
- Network Targeting
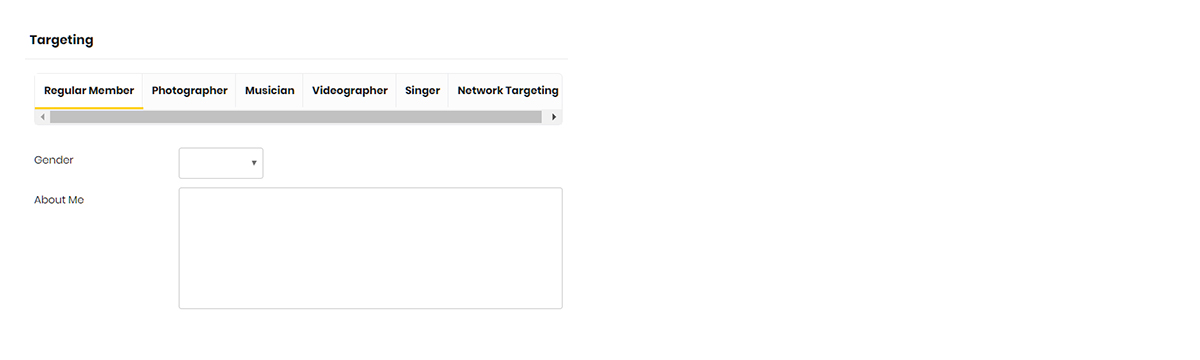
Profile Type Targeting
It is also known as Basic targeting that enables targeting on specific profile fields while creation of Ads such as :
- Personal Information
- First Name
- Last Name
- Gender
- Birthday
- Contact Information
- Website
- Personal Details
- About Me
Admin can configure which profile fields should be enabled for targeting
Advanced targeting enables targeting users of a specific profile type and further refining.
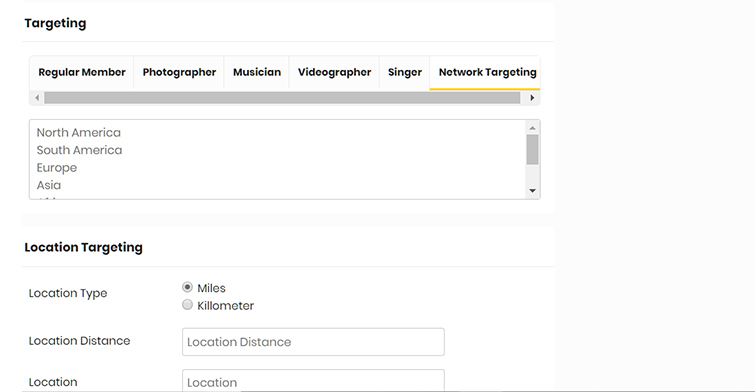
Network Targeting
You can also apply Network Targeting for your Ads through which users that are covered under a particular network area are allowed to access Ads on your website.
In Network Targeting various geographical Locations are mentioned which you can select while applying targeting for your Ads.
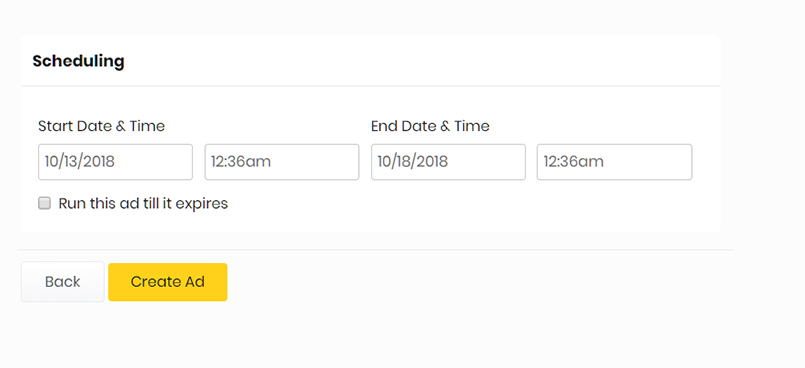
Ad Scheduling
- Scheduling for your Ads can be easily done at the time of creation if you want that your Ads should run for a particular time span.
- You are allowed to set Date and Time(Start & End) for your Ads as scheduling is very important for better and active working of Ads.
- Also if you want your Ad to get never expire, then there is no need to give End date and time.
- Then the expiry date of your Ad will ultimately depend on the expiry date of your Package in which you have created your Ad.
3 Advertising Models
The ratings for your Ads will based on 3 Advertising Models which determines the quality of your Advertisements. More number of actions means more popularity.
These Models are basically named as:
- Pay Per Click(PPC)
- Pay Per View(PPV)
- Pay Per Day(PPD)
Pay Per Click (PPC)
In this Model, the popularity of your Ad will depend upon the number of Clicks you get for your Ad by other members on your Website.
The charges in this model will be applied on the basis of per click which package creator has mentioned when he have created the package.
Pay Per View (PPV)
Similarly this model follows the scenario in which charges are applied on the basis of per View for your Ad.
Whenever your Ad get viewed by other members,everytime the counter for views count will get incremented by 1.
Pay Per Day (PPD)
In this advertising Model, some specific charges are applied/set for your Ad for each day.

Ad Display & Searching
Ad Display
Sometimes it happens that your Ad gets created successfully but not get visible to anyone on your website. So you need to keep in mind that at which places your Ads will get displayed.
Targeted Audience
Your Ads will get displayed to only those users you will match the targeting criteria which you have set at the timed of As creation.
For more info about Targeting, go through Ads Targeting section.

In Widgets & Activity Feed
If you want to enable Display of Ads at various pages on your website then you have to place “Sidebar Widget Ads” Widget on it. It is highly configurable as you can set the display criteria and number for your Ads.
Ads will also get display to other members in their Activity Feed, but for this you have to first Install & Enable Professional Activity & Comments Plugin on your website. After that it will get displayed in your Activity Feed at various pages and in various plugins (Pages, Groups, Events etc.)
Ad Searching
In Community Advertisements Plugin, you are also allowed to search any Ad by entering the searching criteria into the fields at Search widget which you can place at any Page.
You can search an Ad by its Category, Ad Name, Content Type, by its labels(Featured, Sponsored, Most Viewed, Recently Created) very easily.
Ad Categories
Categories / 2nd-level categories / 3rd-level categories
Advertisements supports upto 3 levels of categories.
You can easily create other Sub categories for your previous Parent Categories.
Adding New Category
Each category will have its own Name, Slug, Title, Color, Member Level, Description & 3 type of icons.
Ads Categories in Icons or images
Categories can be displayed in Circular or Square view on your website with their icons or images. These icons and images are uploaded from the admin panel for each category.
Ads Targeting
You can also add descriptions for the categories which you have created for Advertisements.
Secure Transactions
- All the payment transactions of the advertisement packages that Advertisement Owners have made for paid Ads on your website will get listed under Transactions section.
- You can add and enable Payment Gateway(PayPal) for the Paid Packages. You just have to enter your PayPal account details while making Payment and then configure it accordingly.
- With PayPal your transactions will become more secure and fast.
- Also you can view the details for every Transaction such as Ad Id, Ad Title, Ad Owner, Name of Gateway, Status, Amount for Package, Date of Transaction etc .
Mails & Notifications
Seamless Integration with SocialEngine’s Notification and Emails system and for all important actions members on your website will get Notifications & Emails.
In Community Advertisements Plugin, Mails and Notification will send to the users for the following updates:
- Creation of new advertisement to admins
- Ad Approval / disapproval by the admin
- Payment for Advertisement has made
- For Payment Status – Pending, Refund, Overdue, Cancellation
- For Expiration & Activation of Ad
- Waiting for Approval by the Admin
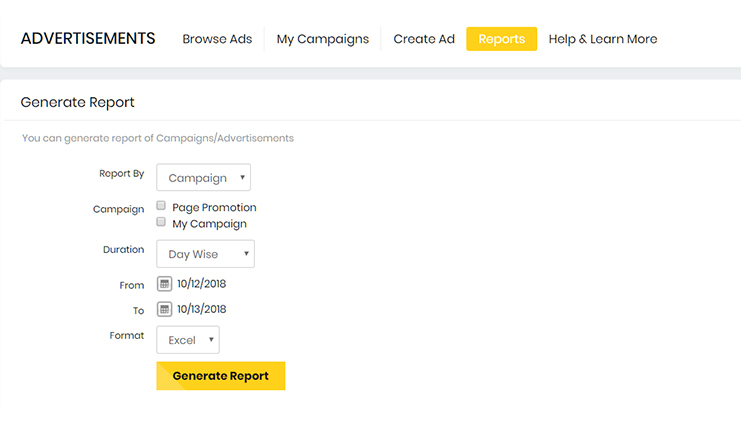
Downloadable Ad Reports
- You are enabled to view and download statistics(Click, View, CTR etc) report for Ads/Campaigns which are created on your website.
- For downloading any Report just go to Reports section on your website and then configure the page according to your requirement and after that click on ‘Generate Report’ button.
- The file will get download in two formats on your Local System:
- Excel file(.xls)
- CSV File(.csv)
Submit Report for offensive Ads
- Everything has its uses and misuses. So sometimes users may create Ads without any mind set and with no purpose which can simply cause harm to the quality of your website which ultimately leads to the decreement of valuable customers.
- Also if someone likes your Ad and mark it as helpful then it will increase the popularity of your business.
- So If you feel any Ad offensive, not relevant or at the other side helpful also then you can submit report for any Ad by just clicking on icon which is present with the Ad at various places and Widgets.
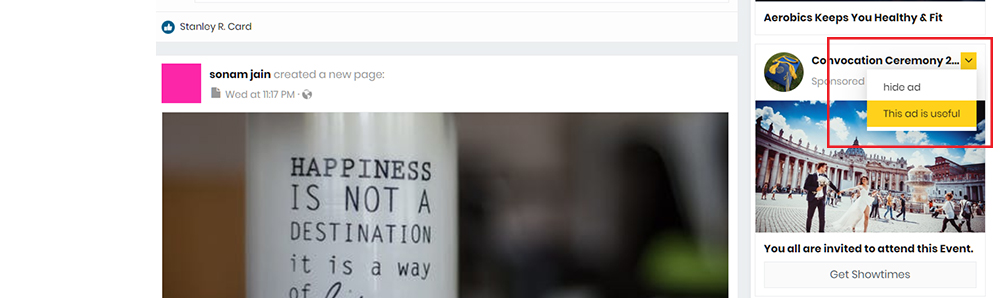
Hide Ad
If you want that some Ads should not display on your website, then you can Hide an Ad.
In this option you can mark the reason of hiding an Ad that why you want to hide an Ad such as :
Offensive, Misleading, Inappropriate, Licensed Material, Other.
Why am I seeing this?
In this option you can mention the reason why you are seeing this Ad and what is it significance.
This Ad is useful
You can mark any Ad as useful if you want. All the report which have submitted will listed out at the Reports section in Admin Panel.
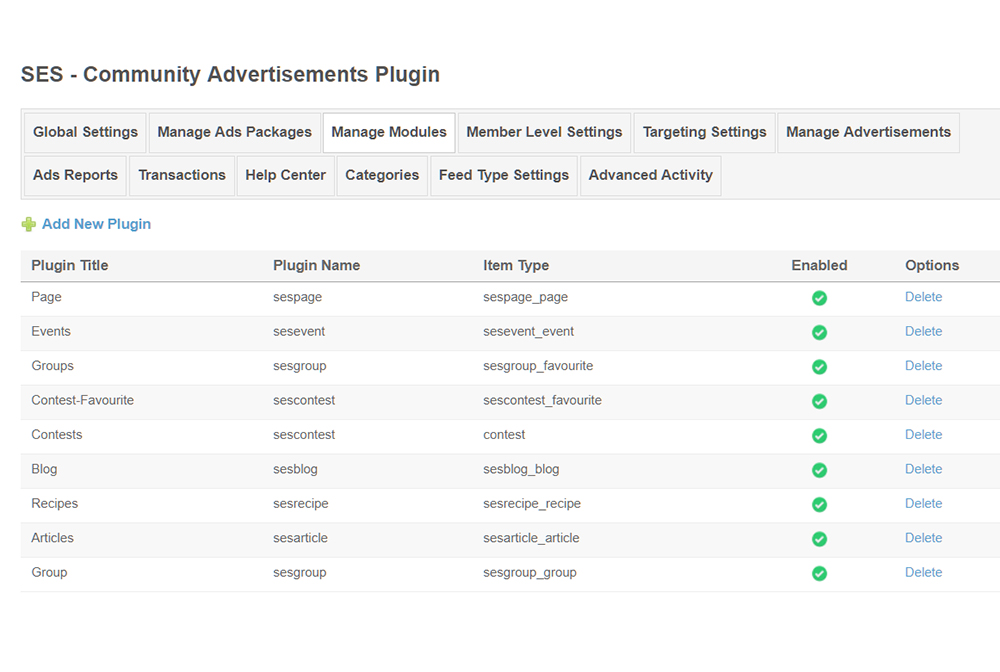
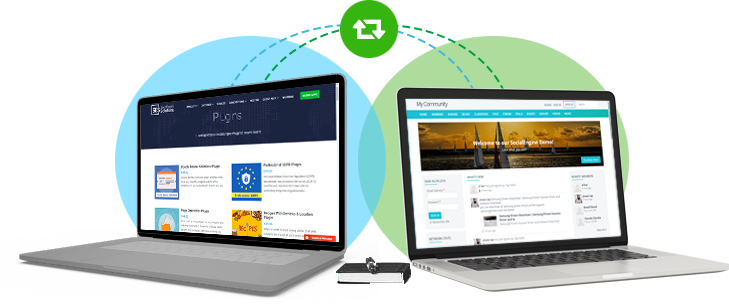
3rd party plugins integration
- This plugin is seamlessly integrated with the SE Groups, SE Events, all SE plugins and other 3rd party plugins such that you can create Ads under any 3rd party plugin on your website.
- So, this plugin saves your money as with this plugin No Need for any Specific extension or plugin to have Advertisements in other plugins on your website.
- This Plugin allows you to integrate any Plugin which is already installed on your website and then enable it for your Advertisements.
- These modules will get displayed at the time of Ad creation under Promote Content type Ad or in other Ads.
Ads Creation in Other Plugins
You can easily enable the creation of Ads in other plugins on your website like Groups, Events, Video Channel, or any other plugin simply by adding it from ‘Manage Modules’ section in Admin Panel.
Integration with Professional Feeds & Comments plugin
If you want to enable Advertisements in various feeds on your website, then you just have to Install and enable “Professional Feeds & Comments Plugin”.
Your Ads will get visible to your members in various feeds and places.
You can configure few settings for your Advertisements under Advanced Activity Settings in Admin Panel.
Enable Advertisement
With the help of this setting you can enable advertisement in Advanced Activity feed.
Display Advertisement
You are allowed to choose which advertisement(All, Sponsored, Featured) you want to display in Activity Feeds.
Feeds on Content Profile Pages
If you want to show advertisement in feeds on content profile pages, then you can enable it also.
Placement
In this setting you can enter that after how many feeds you want to display community ads in advanced activity.
Help Center
For making this plugin more useful, we are offering an additional Help page which will serve your users with their queries and doubts in Ads creations and management on their website.
Widgets
For Community Advertisements Plugin, we have various Widgets with the help of which you can
display Ads on your website. All these widgets are configurable.
-
Ads Payment StatusDisplays the status of Payments done for the Ads on your website.
-
Ads View Page StatsThis will be placed on the Ad View page and displays the Statistics of every Ad at
its View page.The recommended page for this widget is “Ad View page”. -
Browse AdsYou can Browse all the Ads which your users have created on your Website.
-
Want More CustomersPlace it on any page and get more customers through Ads.
-
Browse SearchThis widget will help you to search any specific Ad by entering the searching fields.
-
Sidebar Widget AdsYou can place this widget at any Page in the sidebar and configure it for visibility of your Ads. From here you can also create Ads directly.
-
Manage AdsYou can manage your Ads by placing this widget at Manage Ads Page.
-
Manage Ads CampaignThis widget will place on Manage Campaign Page. with its help you can manage your Campaigns for Ads.
-
Manage Campaigns StatStatistics related to your Campaigns such as View, Clicks, Counts, Likes etc. will get displayed with the help of this widget.
-
ReportsThe recommended Page is “Report Page” where all the statistics reports for your Ads get listed.
-
View AdsYou can view Ads by placing this widget at “View Page”.
-
Help And LearnFor any help and other queries this widget will be placed at “Help and Learn Page”.
Member Level Settings
Allow Viewing of Advertisements
If you want to let users view advertisements on your website, then you can enable this setting. If set to no, some other settings on this page may not apply.
Allow Creation of Advertisements
This setting allows particular member level to create Ads on your website.
This is useful if you want users to be able to view advertisements, but only want certain levels to be able to create advertisements.
Allow Editing of Advertisements
With the help of this setting member levels are allowed to edit Advertisements on your website.
Once the Ad gets started, user is not allowed to edit it. Then you have to edit it from Admin Panel.
Allow Deletion of Advertisements
By enabling this setting, Users are allowed to delete Ads on your Website.

Robust Admin Panel
This plugin has a very powerful admin panel which provides various settings to enable / disable for almost all the options. We have provided a rich set of settings. Writing about admin panel would be too short for this plugin, so we have created Screenshots of all the sections in Admin Panel.

Global Settings
Global Settings allows you to enable Package Information, Category, Initial Subscription Status, Call to Action, Location for your Ads.

Manage Ads Packages
Under this section you can Manage Ads Packages according to your choice. Also mark any free Package as Default for your website.

Manage Modules
You can integrate modules(Plugins) for your Ads from this section and use them in any Ad while its creation.

Member Level Settings
Rich Member level Settings which enables members to create, view, edit and delete Ads on your website.

Targeting Settings
Advanced targeting Settings enables advertisers to reach target audience which is more likely to be interested in their ads. Admin can configure which profile fields should be enabled for targeting.

Manage Advertisements
User can easily manage Advertisements and view details related to them.

Ads Reports
Advertisers can view managed graphical reports for their Ads and campaigns over different durations and time scales.
Transactions
View and manage transactions for paid advertising on your website.

Help Center
This is the help page of Community Advertisements Plugin, where all the required Tutorials and FAQs can be inserted.

Categories
From here you can add new 2nd & 3rd level Categories to the Parent Categories for your Advertisements.

Feed Type Settings
From here you can enable options for the Plugins for Boost a Post type Ad where post from different pages get boost up.

Advanced Activity
Here you can enable various settings for Advertisements in Activity Feeds.
Extension
Community Advertisements Banner Extension
With the help of this extension, Site owners is allowed to create, manage and display unlimited banner Ads for the Guest users by making direct payment via PayPal.
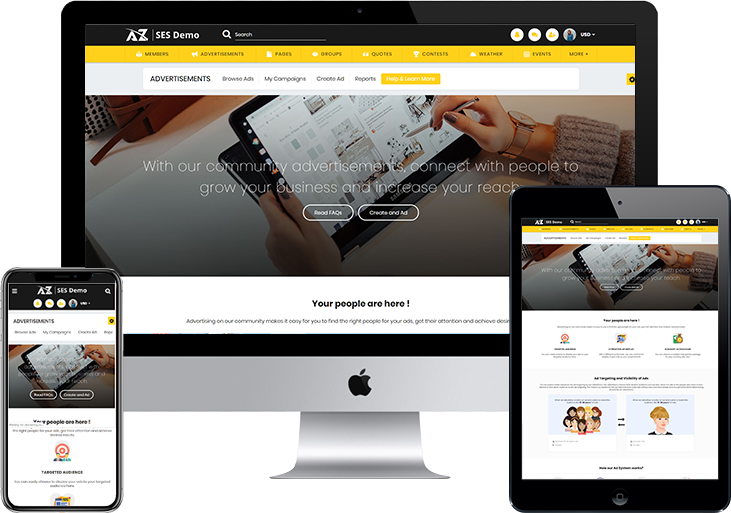
100% Responsive
The plugin is 100% responsive. Automatically adapts to any devices (Mobile phone, tablet and desktop). You can take full control of the color scheme and designing of plugin with our powerful yet easy-to-use admin panel of this plugin from setting to styling.
1 Click Install & Easy To Setup
This plugin can be easily installed with 1 click and can be easily configured. Helpful Video Tutorials, Installation Tutorial and FAQs for this plugin will make it more easy for you to setup and use this plugin on your site.

Lifetime Upgrades with 90 Days Free Support
Get free upgrades lifetime for this plugin and free support for first 90 days of your purchase.


There are no reviews yet.